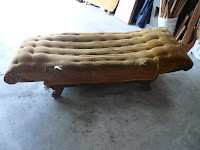
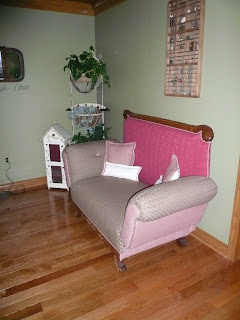
 The antique Fainting Couch is finally finished. It was in bad shape when I received it, and needed lots of tender loving care...
Who ever had recovered this piece last did not recover it right, so when I started I had to do a lot of research on it. I only came up with one picture and it wasn't very good. So I was on my own as to how I was going to recover it. I would put a piece on and take it off again, that went on for quite a while. RIGHT OR WRONG IT IS DONE!

BEFORE PICTURES...
All the springs had to be redone, and retied. Than came the burlap, after that lots and lots of cotton batten. I wanted to do it like it had been done. No Foam!!!
This was the first time I retied the springs, than I found out they weren't tight enough. So I untied and retied!!!
I used lots of tacks of all sizes. I used no staples... I am a pro with a tack hammer now!!! LOL
It seemed like I used a million or so....
I only ran 2 into my fingers, but when I did it I did it good.... This was this stage of the project that really worried me! LOL
 This was this stage of the project that really worried me! LOL
 THANK GOODNESS FOR A GREAT HUSBAND AND HANDY TOO!

It didn't even look like a couch at this point...
 FINISHED...
FINALLY!!!
 Even the back looks cute...
The pillows on the couch were made from antique dish towels that came from my husbands Grandmothers house. I much rather use something like that than just leave them in a drawer never to be seen... This just seemed like the place to put them!
See the new carved pieces on the front of the couch, I found them online and bought 2 sets. I cut one set in half and sanded the edge down until it fit in 2 pieces on each foot. I just kept working it. I was really surprised how well the round swirl fit on the round edge of the foot. LUCK...sheer luck!!!

It is a cool piece since both arms recline.... It looks like a great napping spot...

I put this in our family room, not sure if that is where it will stay. But for now this is it's home.
I told myself after so much work trying to find out anything about this piece, when I was finished I was going to take all the pictures and all the information put it in an envelope and nail it to the inside of the frame. So when someone else tries to take it apart and redo it they will know a little of it's history..So I better go print those pictures...
HAVE A GOOD ONE...
LYNN
UPDATE: I'VE ALREADY MOVED IT TO THE OTHER WALL I THINK I LIKE IT BETTER HERE...


9 comments:
This is a wonderful piece, I have never seen a fainting coach like this, maybe late Victorian? I am about 10 years older than you, and I just don't have the patience for projects any more. You did a great job! Angie
Thanks for stopping by Angie!!! I really enjoy your blog!
Wow, you were brave to take on this redo, but you did a great job. That's one thing I'd love to learn is redoing furn. Thanks for stopping by, Theresa
I am so impressed, Lynn! I thought you were simply reupholstering it; I didn't realize all the work you had to put into it. The finished piece is beautiful. And I love the idea of making pillows out of heirloom dish towels. Quite an accomplishment!
Thanks Theresa and Rose, I am just glad it is finished. We have worked all winter on it. A labor of Love for sure, since we had never done anything like this before.
I knew it would be beautiful. Great job. I do like the 2nd place you put it better..it fits in and looks cozy...Now after all the Easter celebration...go over to the couch and take a well deserved nap.
I knew you would do a great job on it. It turned out wonderful. I love your choice of different fabric patterns. The wood work on it is beautiful.
Yes, it looks better in the new spot you moved it to.
Have a Blessed Easter.
Thanks Girls, I like it better there too. Have a Great Easter!!!
Wow, Lynn! It's beautiful. What a big job, I've never seen a fainting couch like this either. I have a dear friend who does upholstery, so I know what a difficult project this must have been. She did the sofa on my blog header. Great job!
Post a Comment