
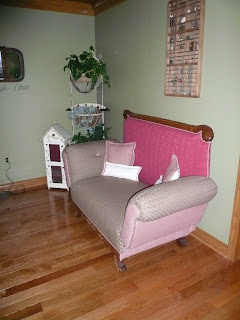
The antique Fainting Couch is finally finished. It was in bad shape when I received it, and needed lots of tender loving care...
Who ever had recovered this piece last did not recover it right, so when I started I had to do a lot of research on it. I only came up with one picture and it wasn't very good. So I was on my own as to how I was going to recover it. I would put a piece on and take it off again, that went on for quite a while. RIGHT OR WRONG IT IS DONE!

BEFORE PICTURES...
All the springs had to be redone, and retied. Than came the burlap, after that lots and lots of cotton batten. I wanted to do it like it had been done. No Foam!!!
This was the first time I retied the springs, than I found out they weren't tight enough. So I untied and retied!!!
I used lots of tacks of all sizes. I used no staples... I am a pro with a tack hammer now!!! LOL
It seemed like I used a million or so....
I only ran 2 into my fingers, but when I did it I did it good....

This was this stage of the project that really worried me! LOL
THANK GOODNESS FOR A GREAT HUSBAND AND HANDY TOO!

It didn't even look like a couch at this point...
 FINISHED...FINALLY!!!
 Even the back looks cute...
The pillows on the couch were made from antique dish towels that came from my husbands Grandmothers house. I much rather use something like that than just leave them in a drawer never to be seen... This just seemed like the place to put them!
See the new carved pieces on the front of the couch, I found them online and bought 2 sets. I cut one set in half and sanded the edge down until it fit in 2 pieces on each foot. I just kept working it. I was really surprised how well the round swirl fit on the round edge of the foot. LUCK...sheer luck!!!

It is a cool piece since both arms recline.... It looks like a great napping spot...

I put this in our family room, not sure if that is where it will stay. But for now this is it's home.
I told myself after so much work trying to find out anything about this piece, when I was finished I was going to take all the pictures and all the information put it in an envelope and nail it to the inside of the frame. So when someone else tries to take it apart and redo it they will know a little of it's history..So I better go print those pictures...
HAVE A GOOD ONE...
LYNN
UPDATE: I'VE ALREADY MOVED IT TO THE OTHER WALL I THINK I LIKE IT BETTER HERE...
The rug on the floor was made by my husbands Grandmother back in the 60's . I have 3 of them in this room now...
 Have you ever had one of those marvelous days that you just want to remember for a long time? I just love to work at the greenhouses at West Virginia University. That is what I want to do when I "grow up" is have my own greenhouse to work in... I love everything about it, there is always something to do and I am marveled about it all. Planting, seeding, transplanting, propagating, watering, even cleaning up things. I could be happy the rest of my days in a greenhouse. I love to talk about flowers and explaining what plants to plant where and what one go together in shade or sun, helping the customers figure out what to plant!!! It is just FUN...
 BEAUTIFUL BLOOMS...


 I added a little greenery and a small birdhouse so it is finally finished!!! Thank you so much Penny for the inspiration your Blog gave me, you are one of a kind Wonderful!!!


 These little
  Any lasagna with spinach and lots of cheese has to be good, but this one has lots of other great stuff too...You have to try it!!!
 A little Torenia and some Million Bells...
 Lots of Impatients....
 Petunias lots of different Petunias... My children call me the Petunia Queen...
 I just planted all my Lobelia and Alyssum last night. So they are in the greenhouse with light and heat mats... Nice and warm in there!
 Tomatoes are doing almost too well, they will be blooming before I get them out!LOL
 This is a whole different story, I took these from my daughters attic yesterday. She moved into a house with lots of leftovers in the attic. West Virginia Commemorative RC bottles. They are dated 1974, the same year we were married. I just had to have them.
.JPG)
 Wait until you see the Huge antique picture frame I came home with also... ANOTHER PROJECT! Just what I needed another PROJECT!!


